This is the guide how to use the online class when accessing mobile. 
Table of Contents
Click on the guide to jump directly to it!
Before the online class, you need to check the status of your camera and microphone.
>>> Go to Checklist for Online Class Environment
If possible, please use a PC for smooth connecting.
Android
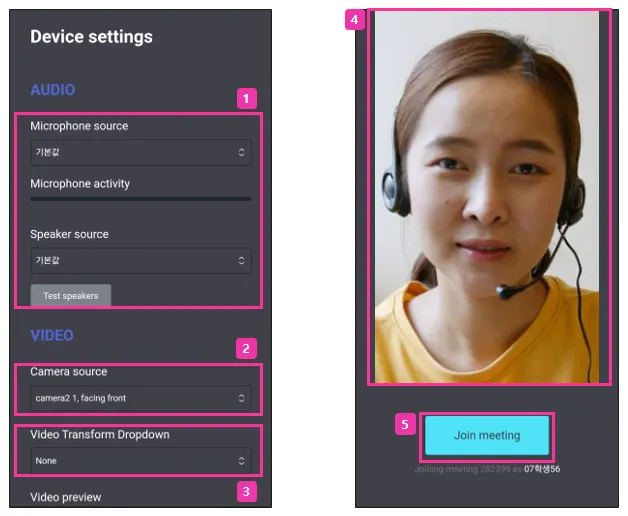
Setting up the Environment

1.
Set up the microphone/speaker.
2.
Set up the camera/resolution.
3.
Set up the background screen.
You can remove the background or blur it.
4.
Check if the camera is working properly.
5.
Click Join meeting to enter the online class.
If the network speed is slow, it is recommended to lower the resolution.
Exploring the Basic Video Screen
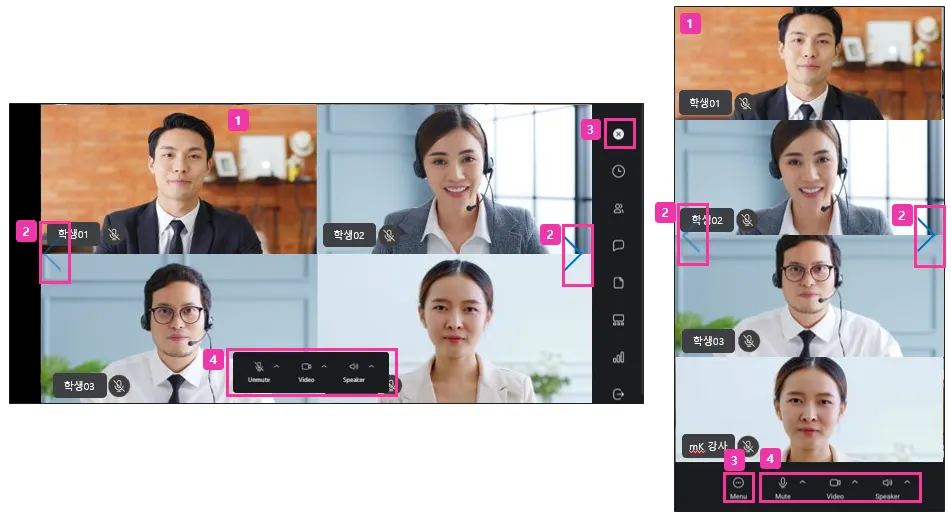
1.
The basic screen shows everyone's screens in the same small size.
2.
Click the left and right buttons to move to the next page.
If there are more than 4 students, you can click the left and right page buttons to see the next screen.
3.
This is the overall class menu. There are a total of 7 functions.
(1) Class timer
(2) Participant list
(3) Chat
(4) Lesson
(5) Camera screen change (Presenter appears larger)
(6) Network speed check
(7) Exit
4.
This is the basic toolbar used during class. There are a total of 3 functions.
(1) Turn microphone ON/OFF
(2) Turn video ON/OFF
(3) Turn speaker ON/OFF
The basic toolbar disappears if it is not used for 30 seconds.
If it disappears, touch the screen to make it reappear.
Presenter Mode
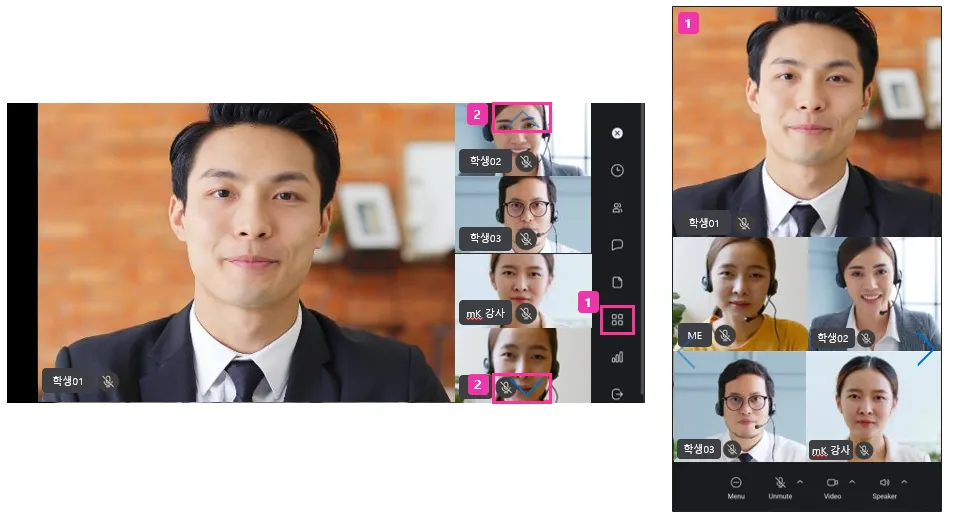
1.
You can switch to various screens. Presenter mode shows the presenter the largest.
If all the microphones are turned off, the teacher appears.
2.
If there are more than 4, you need to move to the next page to touch up-down button.
Screen Sharing/Whiteboard

1.
The student's drawing tool is not visible on mobile. When you receive drawing permission, it will be displayed on the screen immediately.
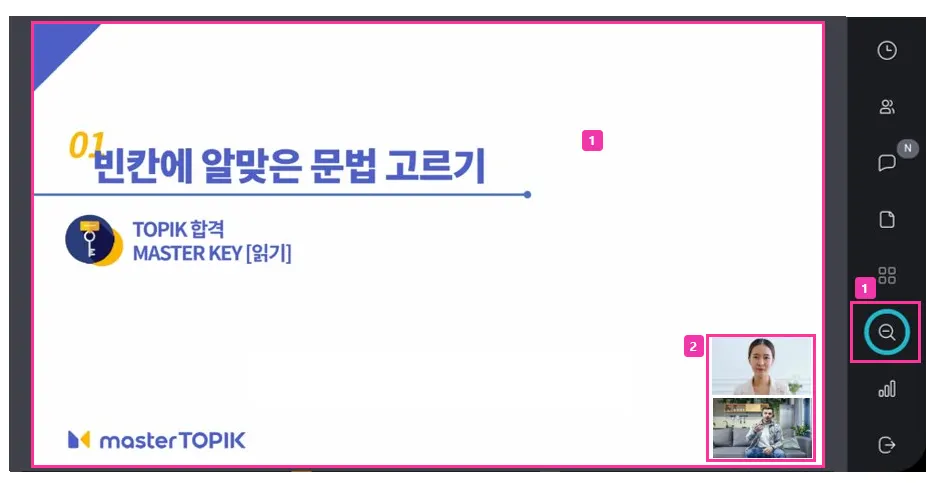
1.
When sharing the screen, click the magnifying glass button to zoom in to full screen.
2.
When the screen enlarges, the teacher's screen will appear in the lower right corner.
iOS
Setting up the Environment
1.
Set up the microphone/speaker.
2.
Set up the camera/resolution.
3.
Set up the background screen.
You can remove the background or blur it.
4.
Check if the camera is working properly.
5.
Click Join meeting to enter the online class.
If the network speed is slow, it is recommended to lower the resolution.
Exploring the Basic Video Screen

1.
The basic screen shows everyone's screens in the same small size.
2.
Click the left and right buttons to move to the next page.
If there are more than 4 students, you can click the left and right page buttons to see the next screen.
3.
This is the overall class menu. There are a total of 7 functions.
(1) Class timer
(2) Participant list
(3) Chat
(4) Lesson
(5) Camera screen change (Presenter appears larger)
(6) Network speed check
(7) Exit
4.
This is the basic toolbar used during class. There are a total of 3 functions.
(1) Turn microphone ON/OFF
(2) Turn video ON/OFF
(3) Turn speaker ON/OFF
The basic toolbar disappears if it is not used for 30 seconds.
If it disappears, touch the screen to make it reappear.
Presenter Mode

1.
You can switch to various screens. Presenter mode shows the presenter the largest.
If all the microphones are turned off, the teacher appears.
2.
If there are more than 4, you need to move to the next page to touch up-down button.
Screen Sharing/Whiteboard

1.
The student's drawing tool is not visible on mobile. When you receive drawing permission, it will be displayed on the screen immediately.

1.
When you click the Menu during screen sharing, you can find Zoom In button.
2.
When the screen enlarges, the teacher's screen will appear in the lower right corner.